Table of Contents
Share On
Noon Marketplace Integration
This native integration with Noon enables order, catalog and inventory synchronization seamless.
Version: v1.0
Date: January 11, 2025
Owner: Sales Channel Product Team
1. Overview
What this integration does
The Noon integration connects your Noon Marketplace store with Omniful so that:
- Orders created through Noon automatically sync to Omniful for processing.
- Inventory availability maintained in Omniful can be synced to Noon.
- You can configure hub mapping, order status mapping, directly from Omniful.
2. Prerequisites
2.1 Sales Channel prerequisites
You will be required to obtain the following details from Noon Store:
- Integration Name
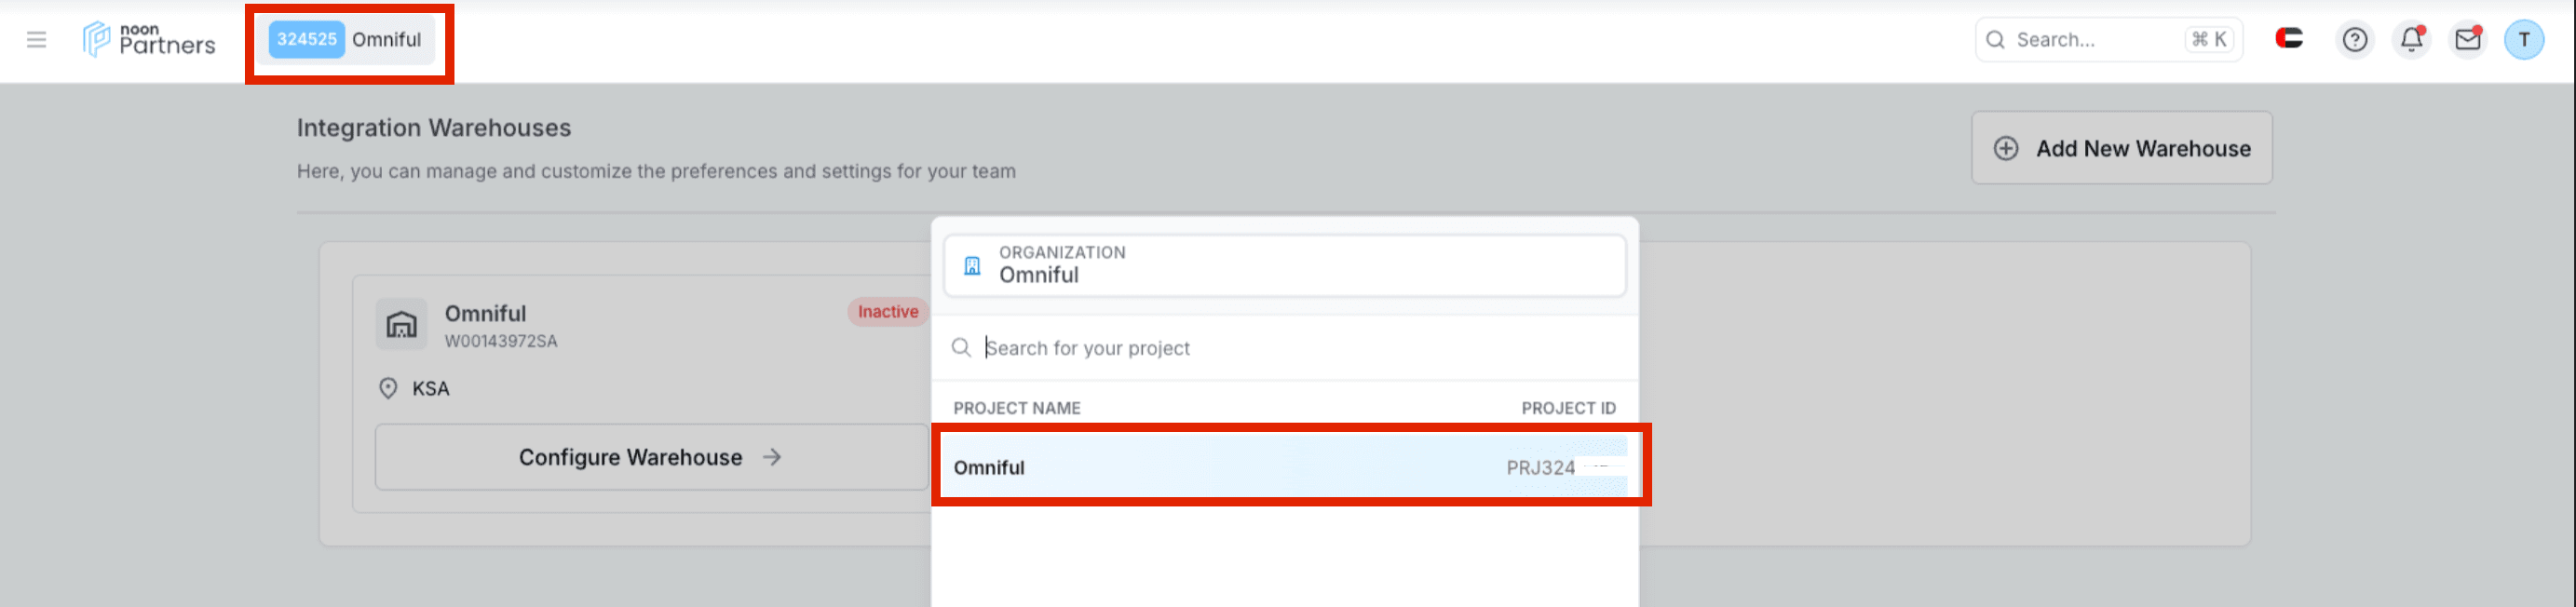
- Project ID (Which can be obtained by clicking on Organisation Name → Project)
- Store Credentials
2.2 To obtain the above details
- Go to your Noon Partner dashboard.
- Click on User Access.
- Find the column labeled “API Users.”
- Add a New Service Account with the Account Type “apijwt.”. When creating an API user, always assign the role Project Owner to avoid sync failures.
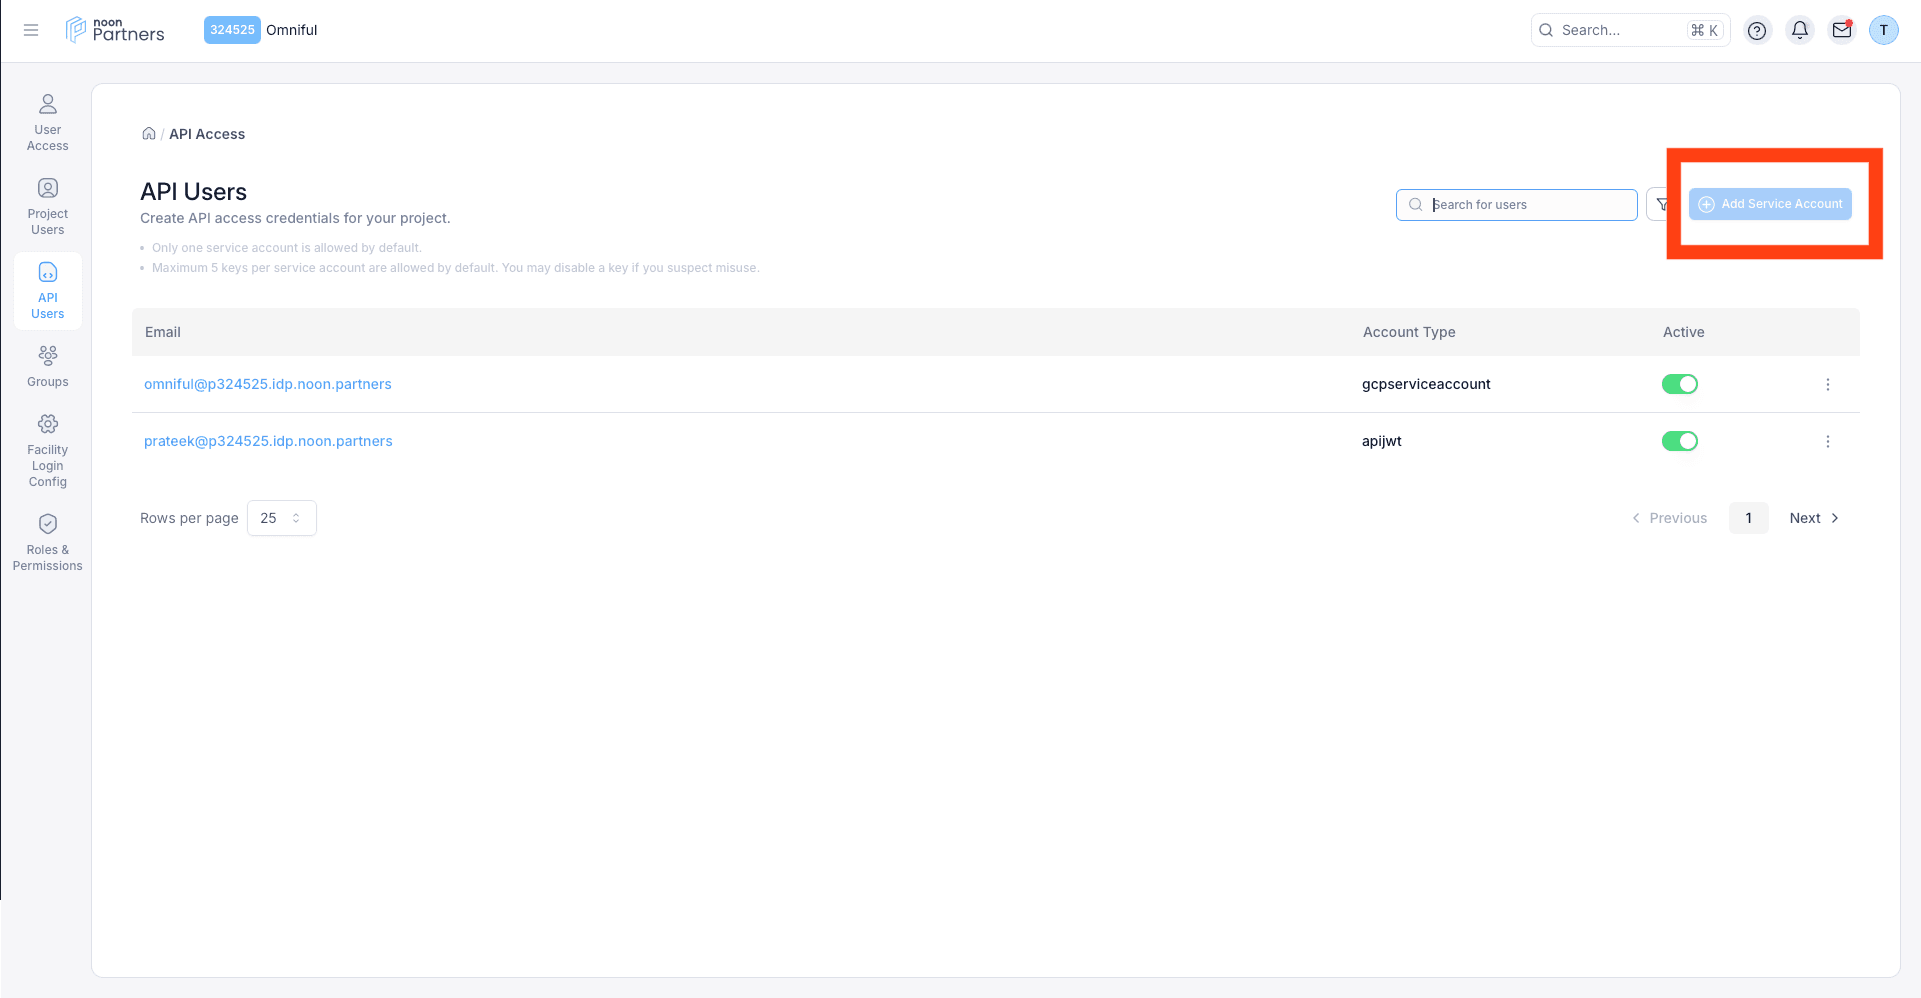
- If credentials are not downloaded automatically, then generate the client credentials by clicking “Add New” and copy the contents of the
store_credentials.jsondownloaded file.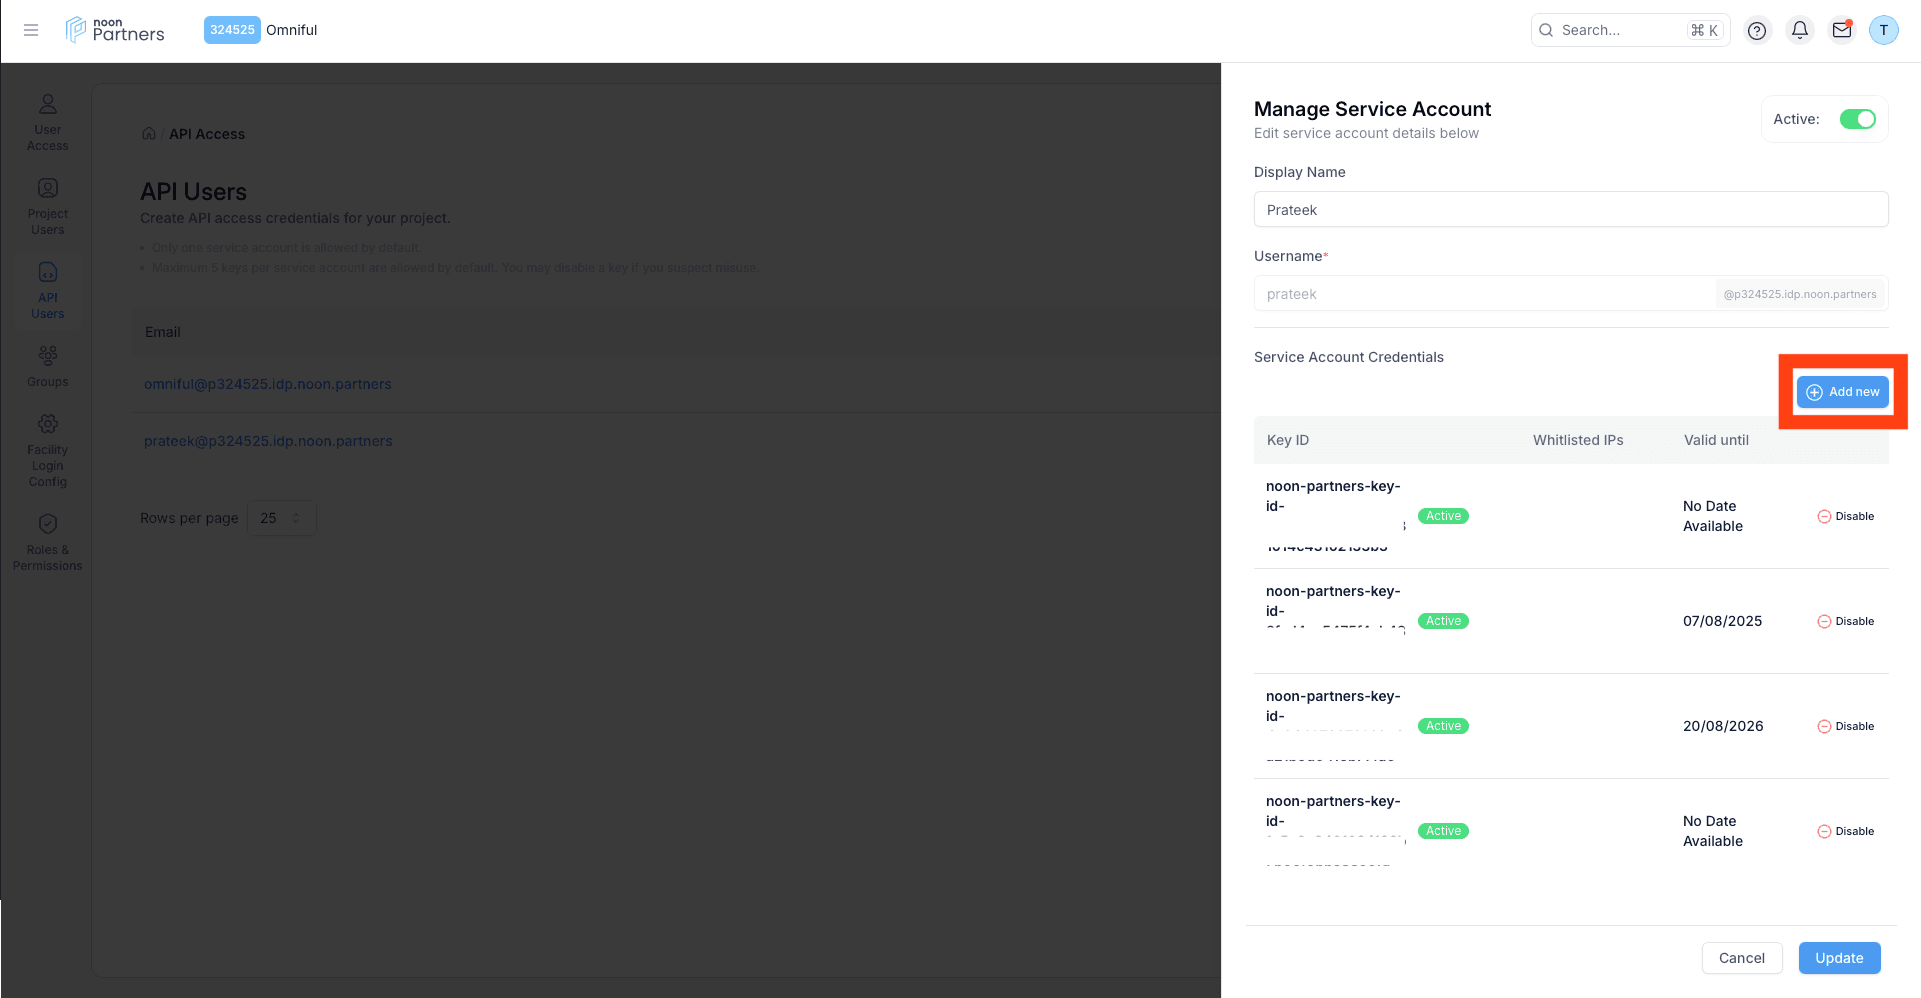
3. Integration Methods and Setup
3.1 Connect Noon store in Omniful
Once you have the required details:
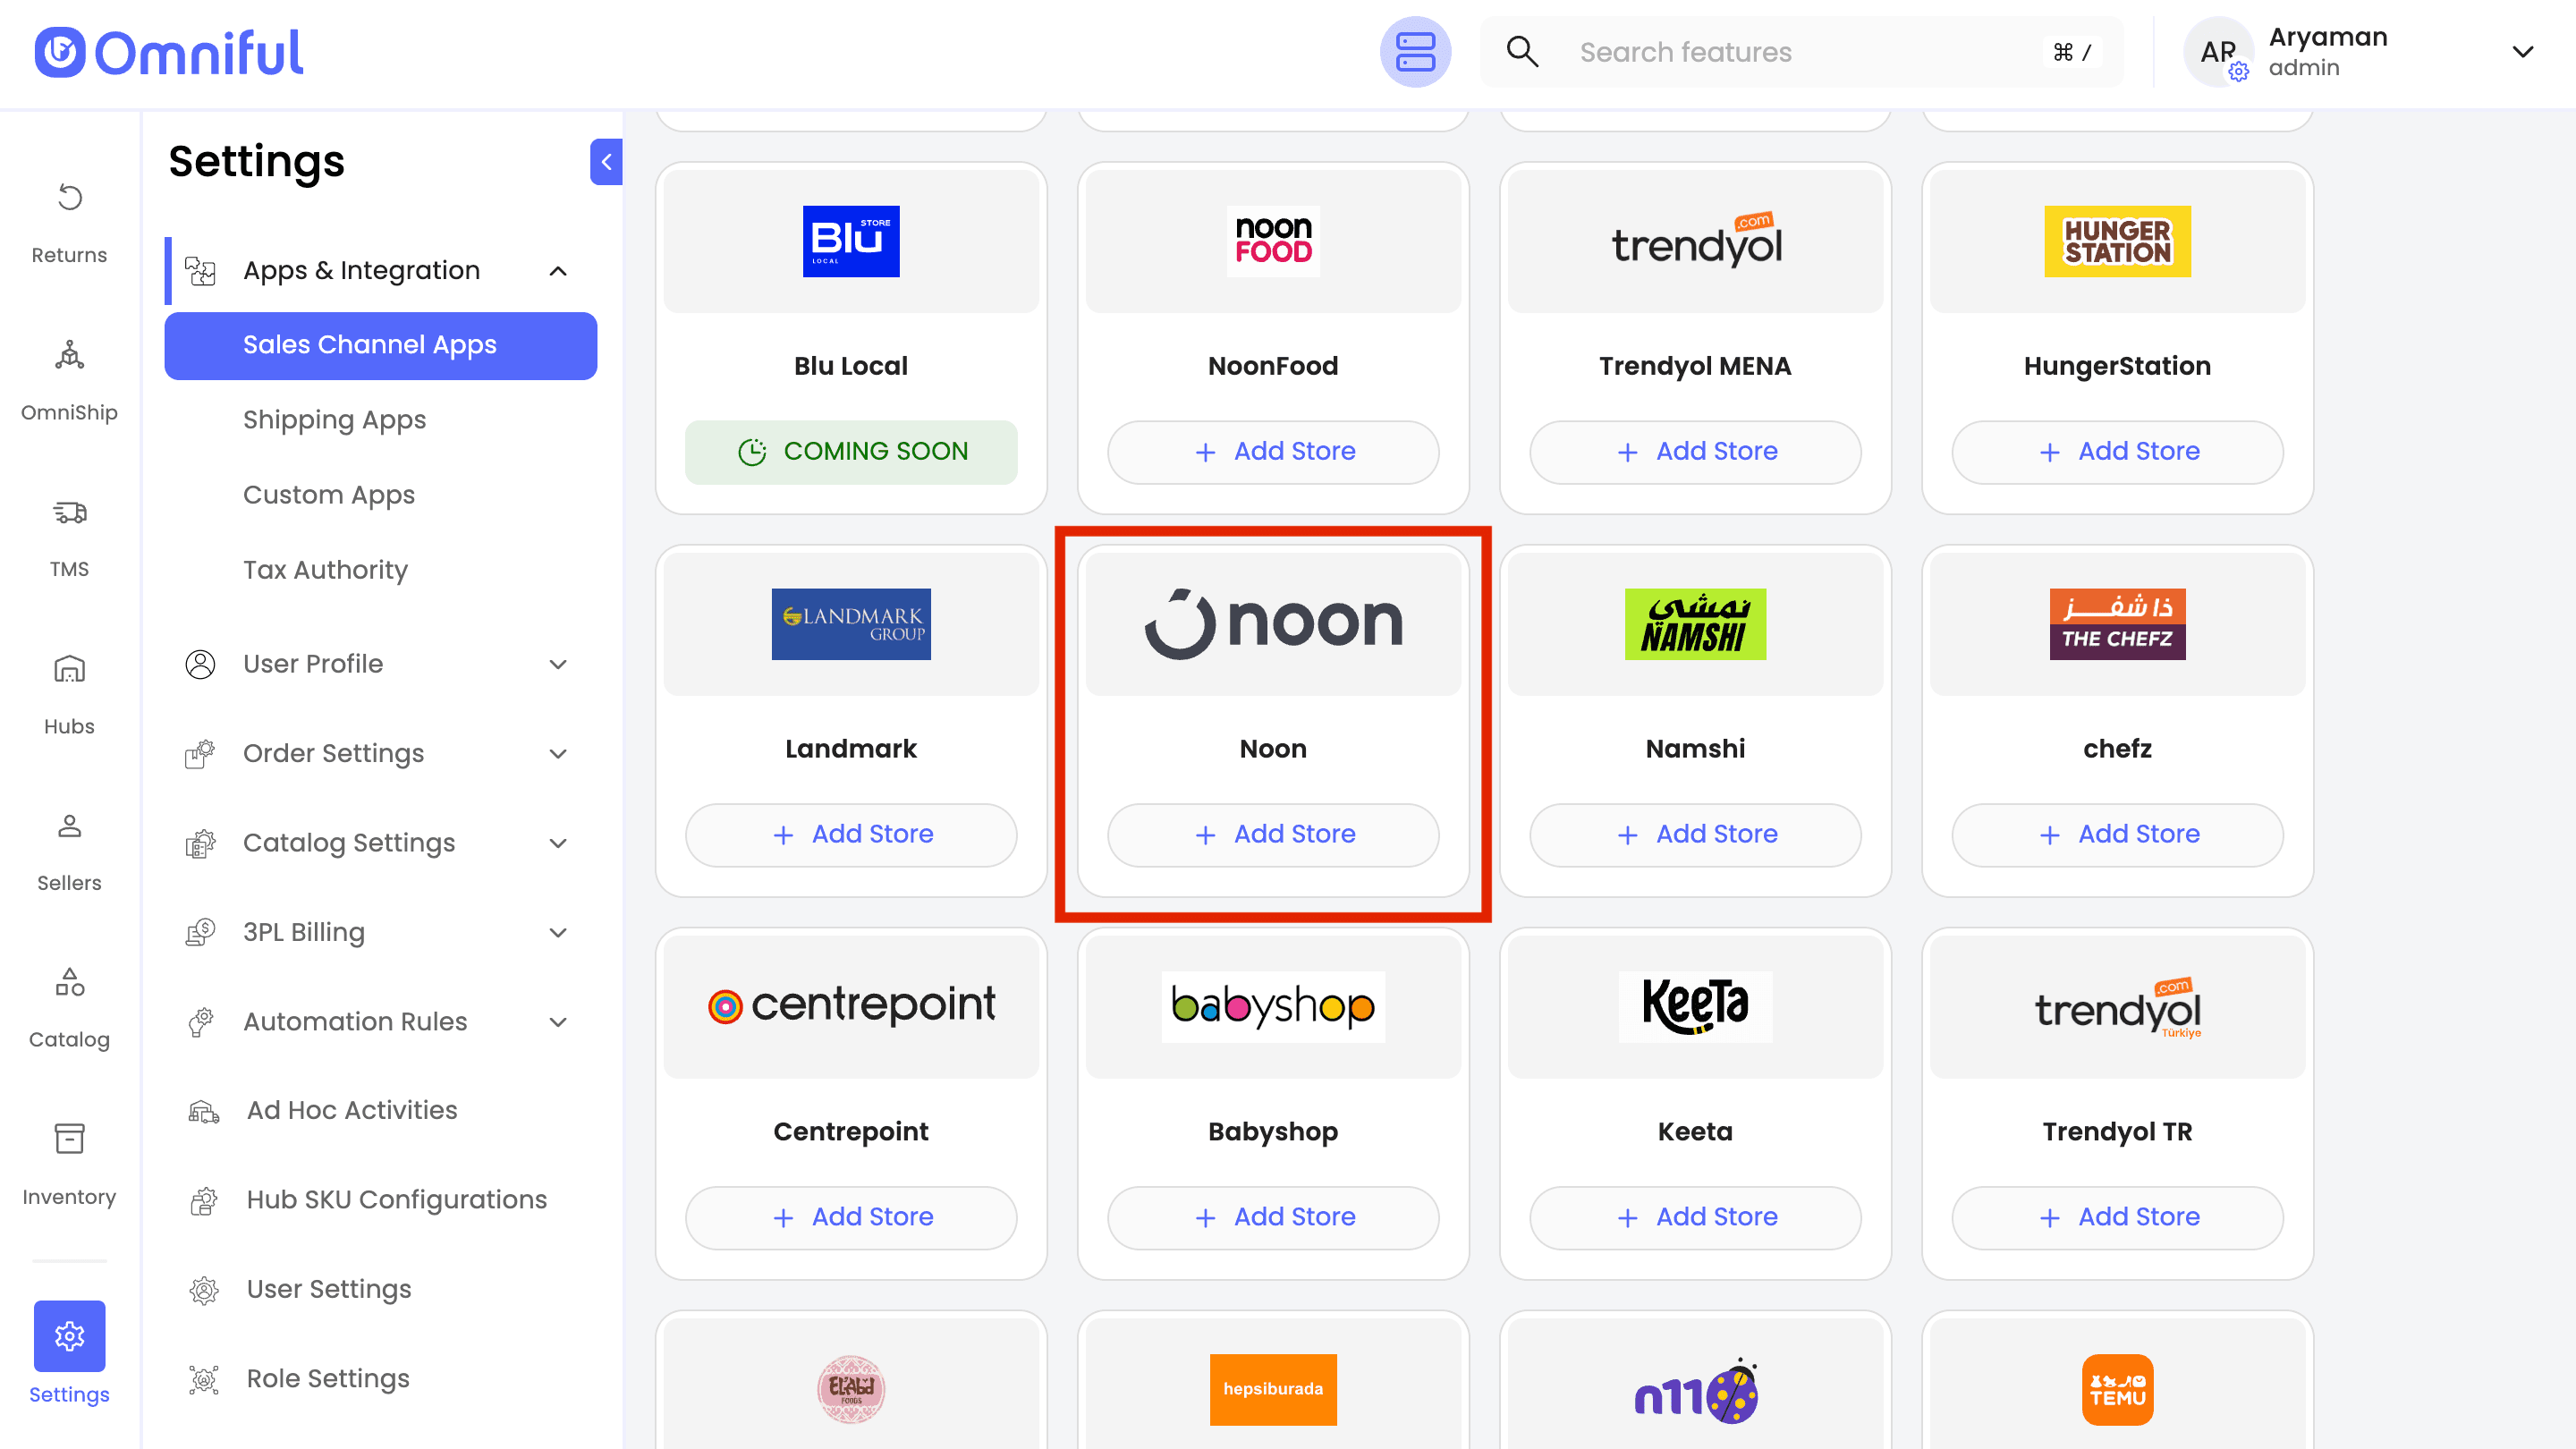
In Omniful, go to:
Settings → Apps & Integration → Sales Channel Apps
-
Select Seller and choose Noon from the marketplace section.
-
Click Add Store.
-
Enter all required information in the corresponding input fields:
- Integration Name: your integration name
- Project ID: copy and paste from your Noon Dashboard → Organisation Name → Project
- Store Credentials: paste complete content of
store_credentials.json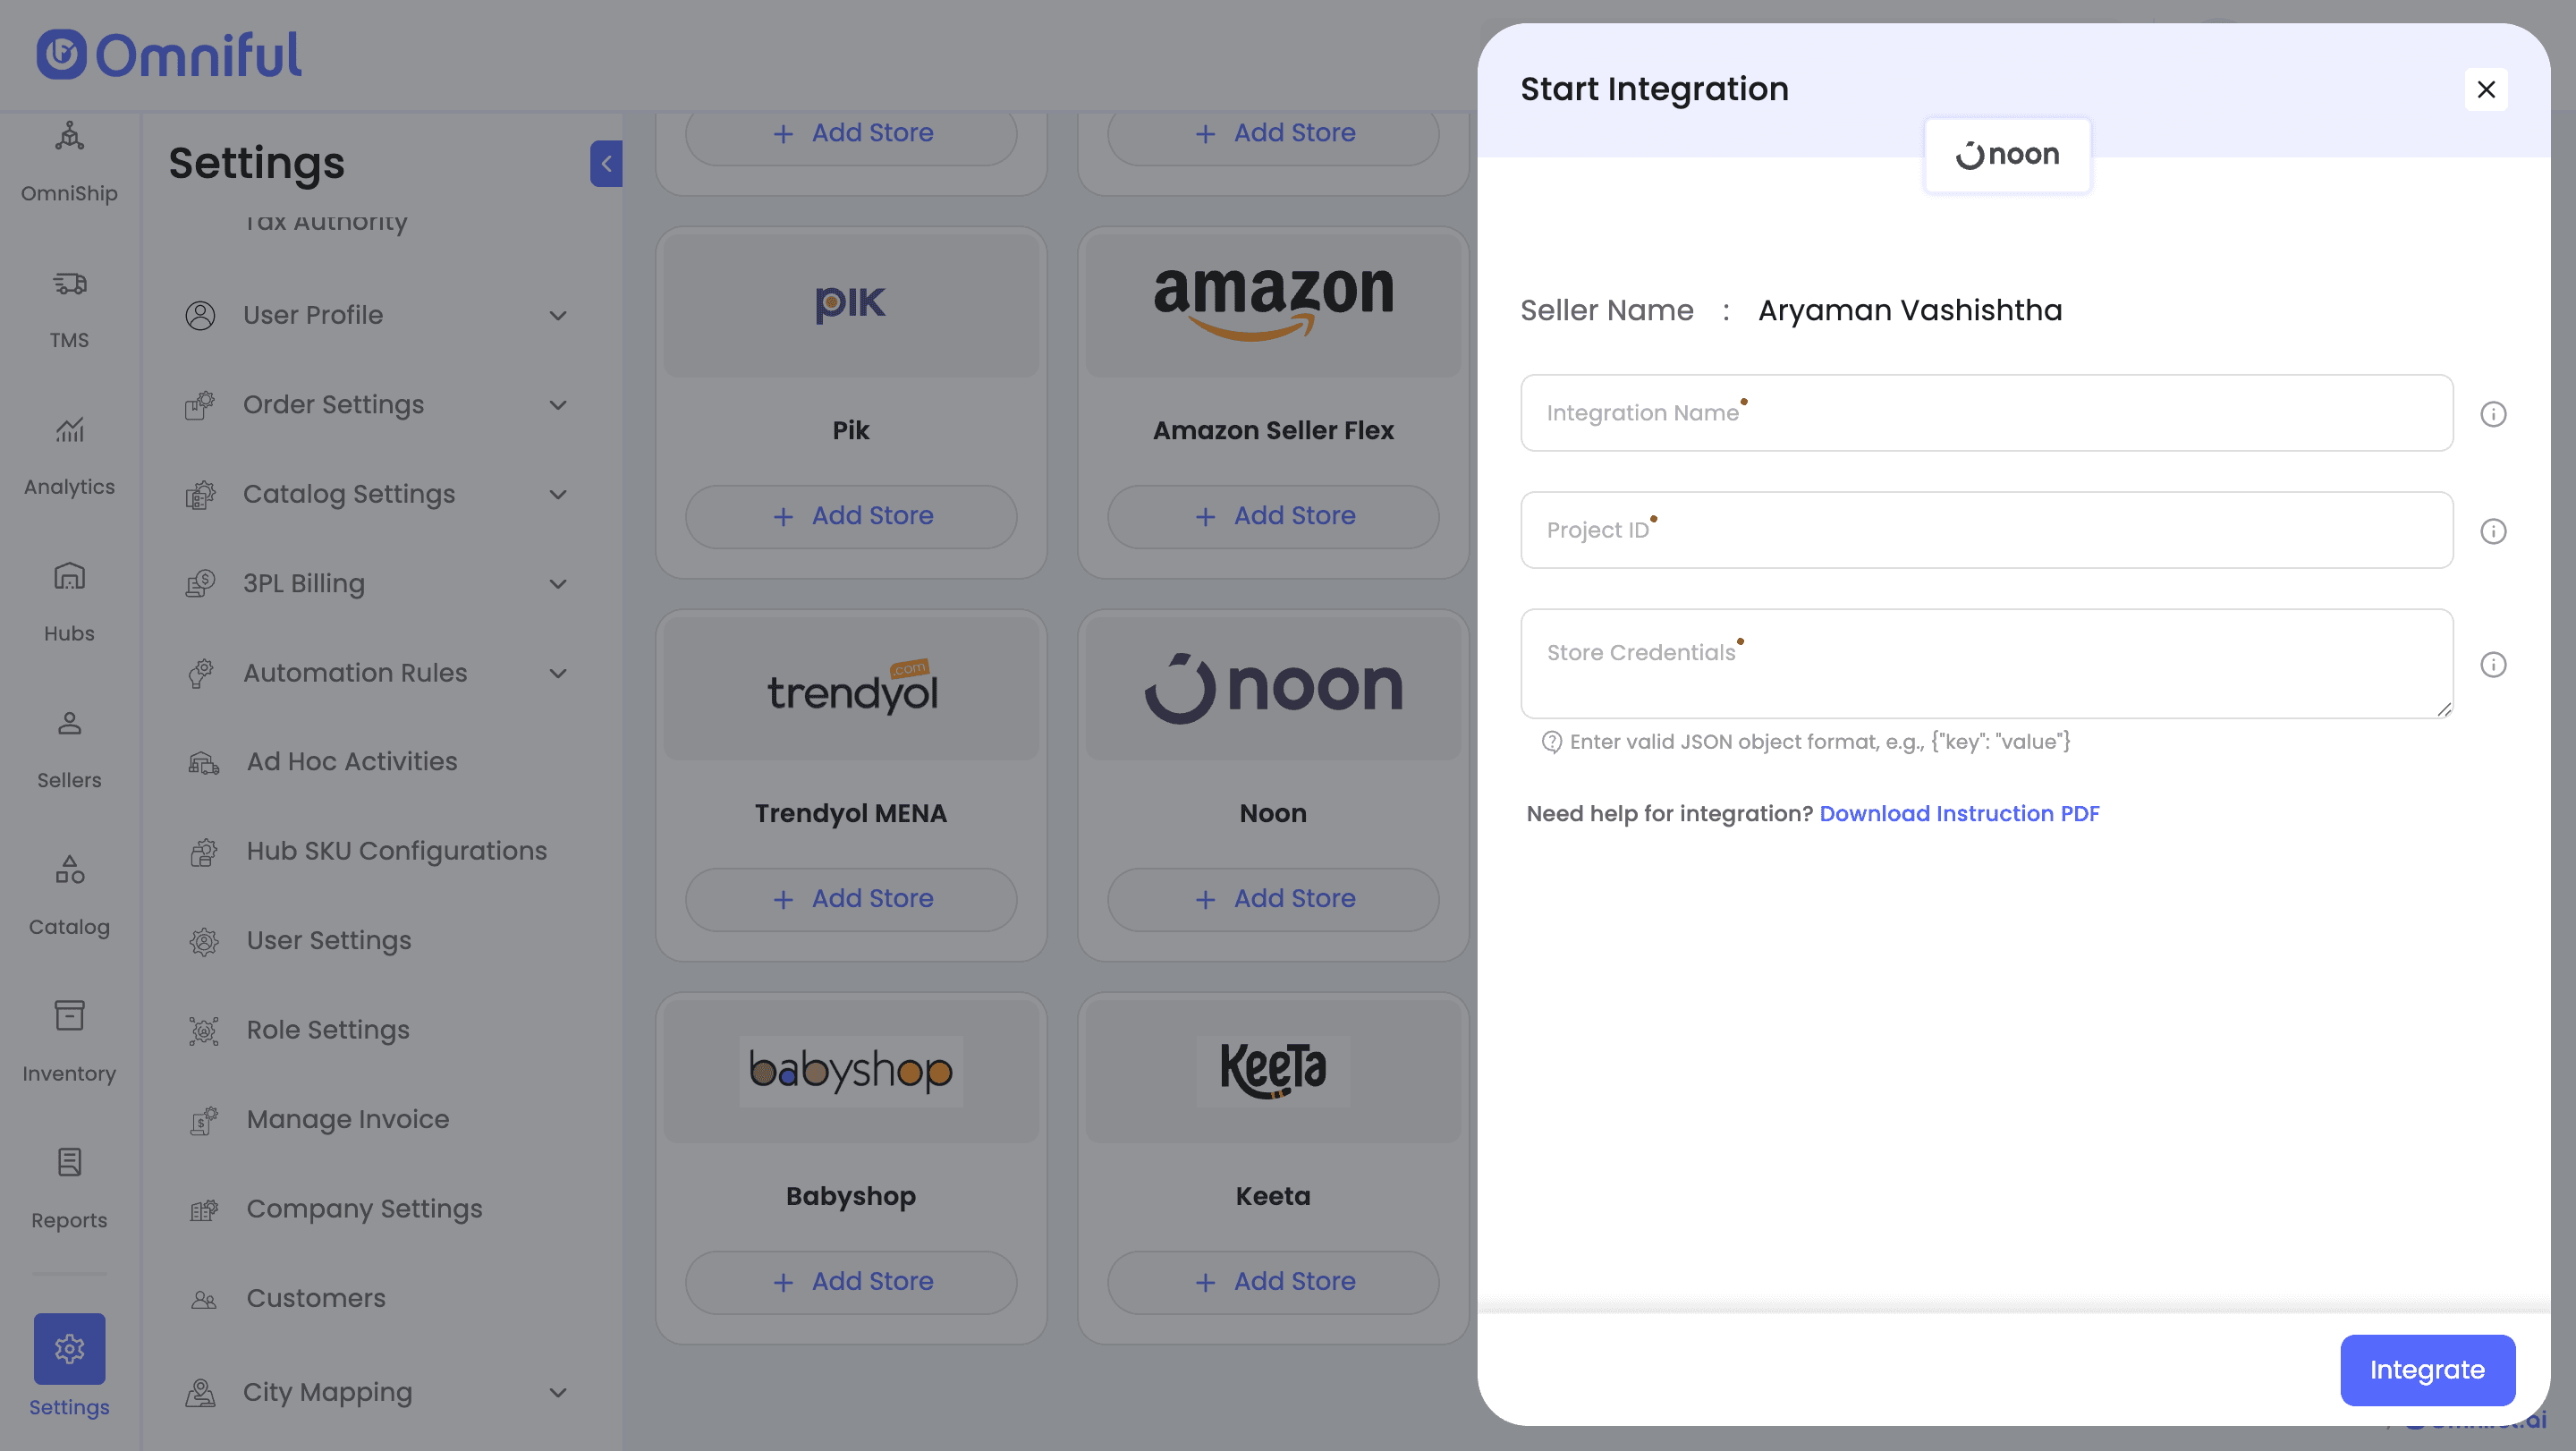
-
Click Integrate.
Access Warehouse Automation Tool
Navigate to the following URL, replacing PRJ(your_project_nr) with your actual project number:
[https://fbpi.noon.partners/en-ae?project=PRJ(your_project_nr)](link)
- Create a New Warehouse by clicking “Add New Warehouse.”
- Enter your Warehouse Name.
- Select the Country where your warehouse is located.
- Click Create Warehouse.
Configure the Warehouse
Click on “Configure Warehouse” next to your newly created warehouse. Configuration involves two parts:
- Choose Integrator: Select “Act as your own integrator.”
- Enter your Webhook URL.
- Enter your Webhook secret in the API Key field.
- Click OK.
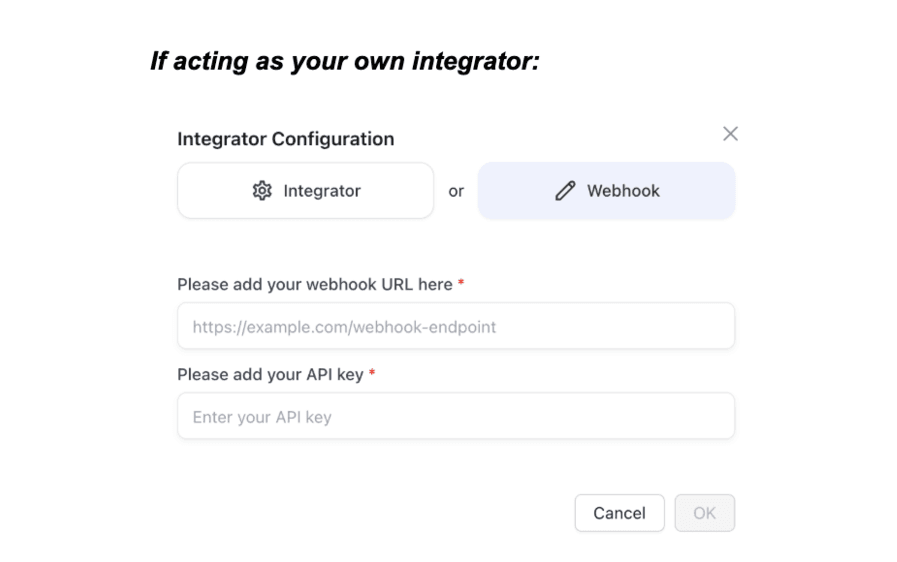
To get Webhook URL and Webhook API Key for Noon Integration:
- Go to Noon Integration → Store Settings → Configuration Tab.
- Copy the Webhook URL and Webhook API Key.

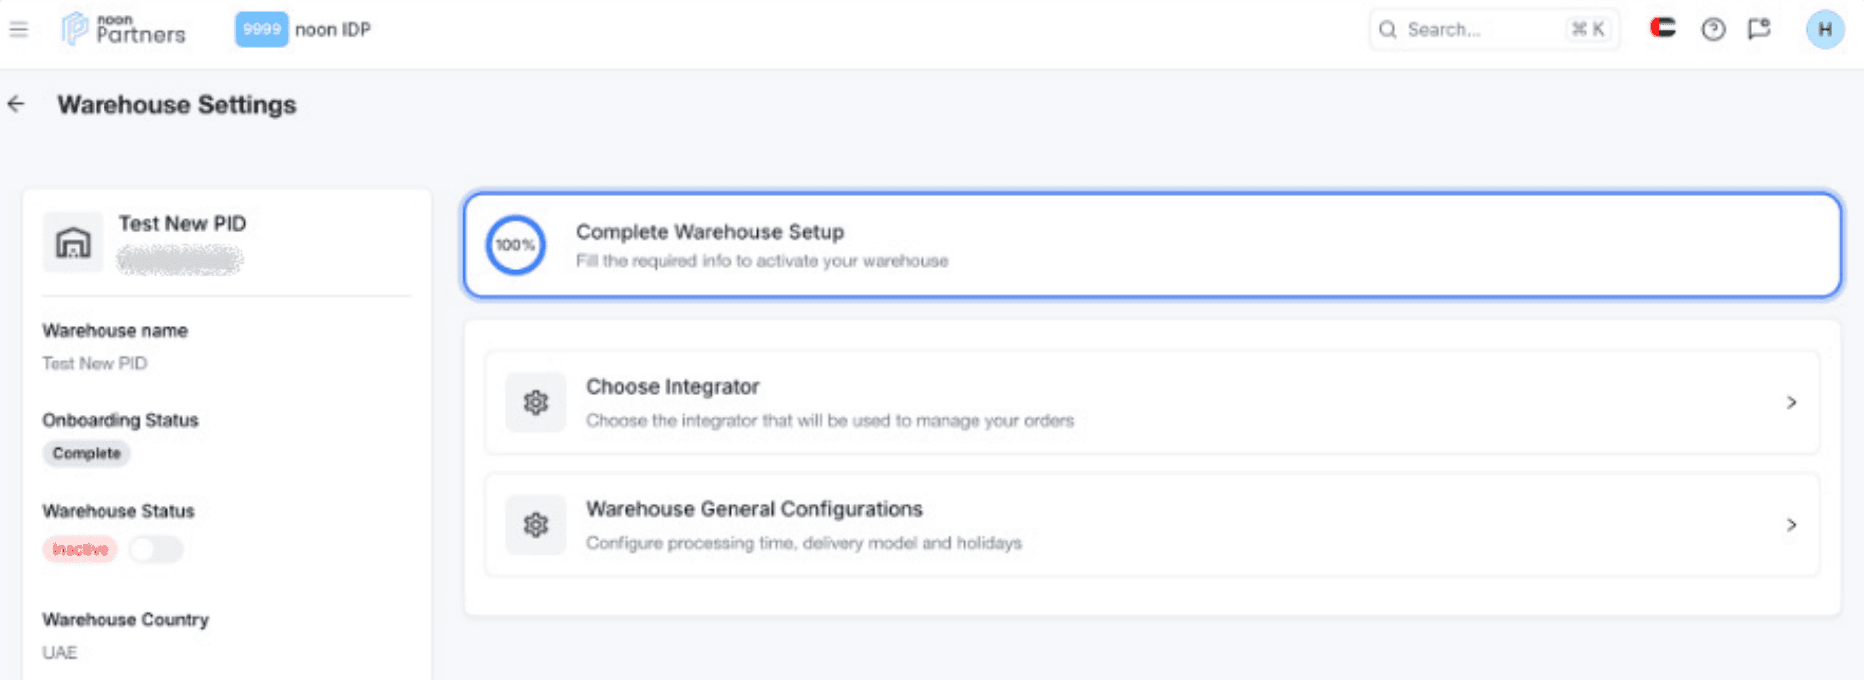
Provide the Processing Time (mandatory), Delivery Model (mandatory), and Operational Holidays (optional) under Warehouse General Configurations to complete warehouse setup.
Activate the Warehouse:
Use the toggle below the warehouse status to set it to Active. The warehouse is now fully configured.
4. Omniful Configuration
Once the store is connected, configure how data flows between Noon and Omniful.
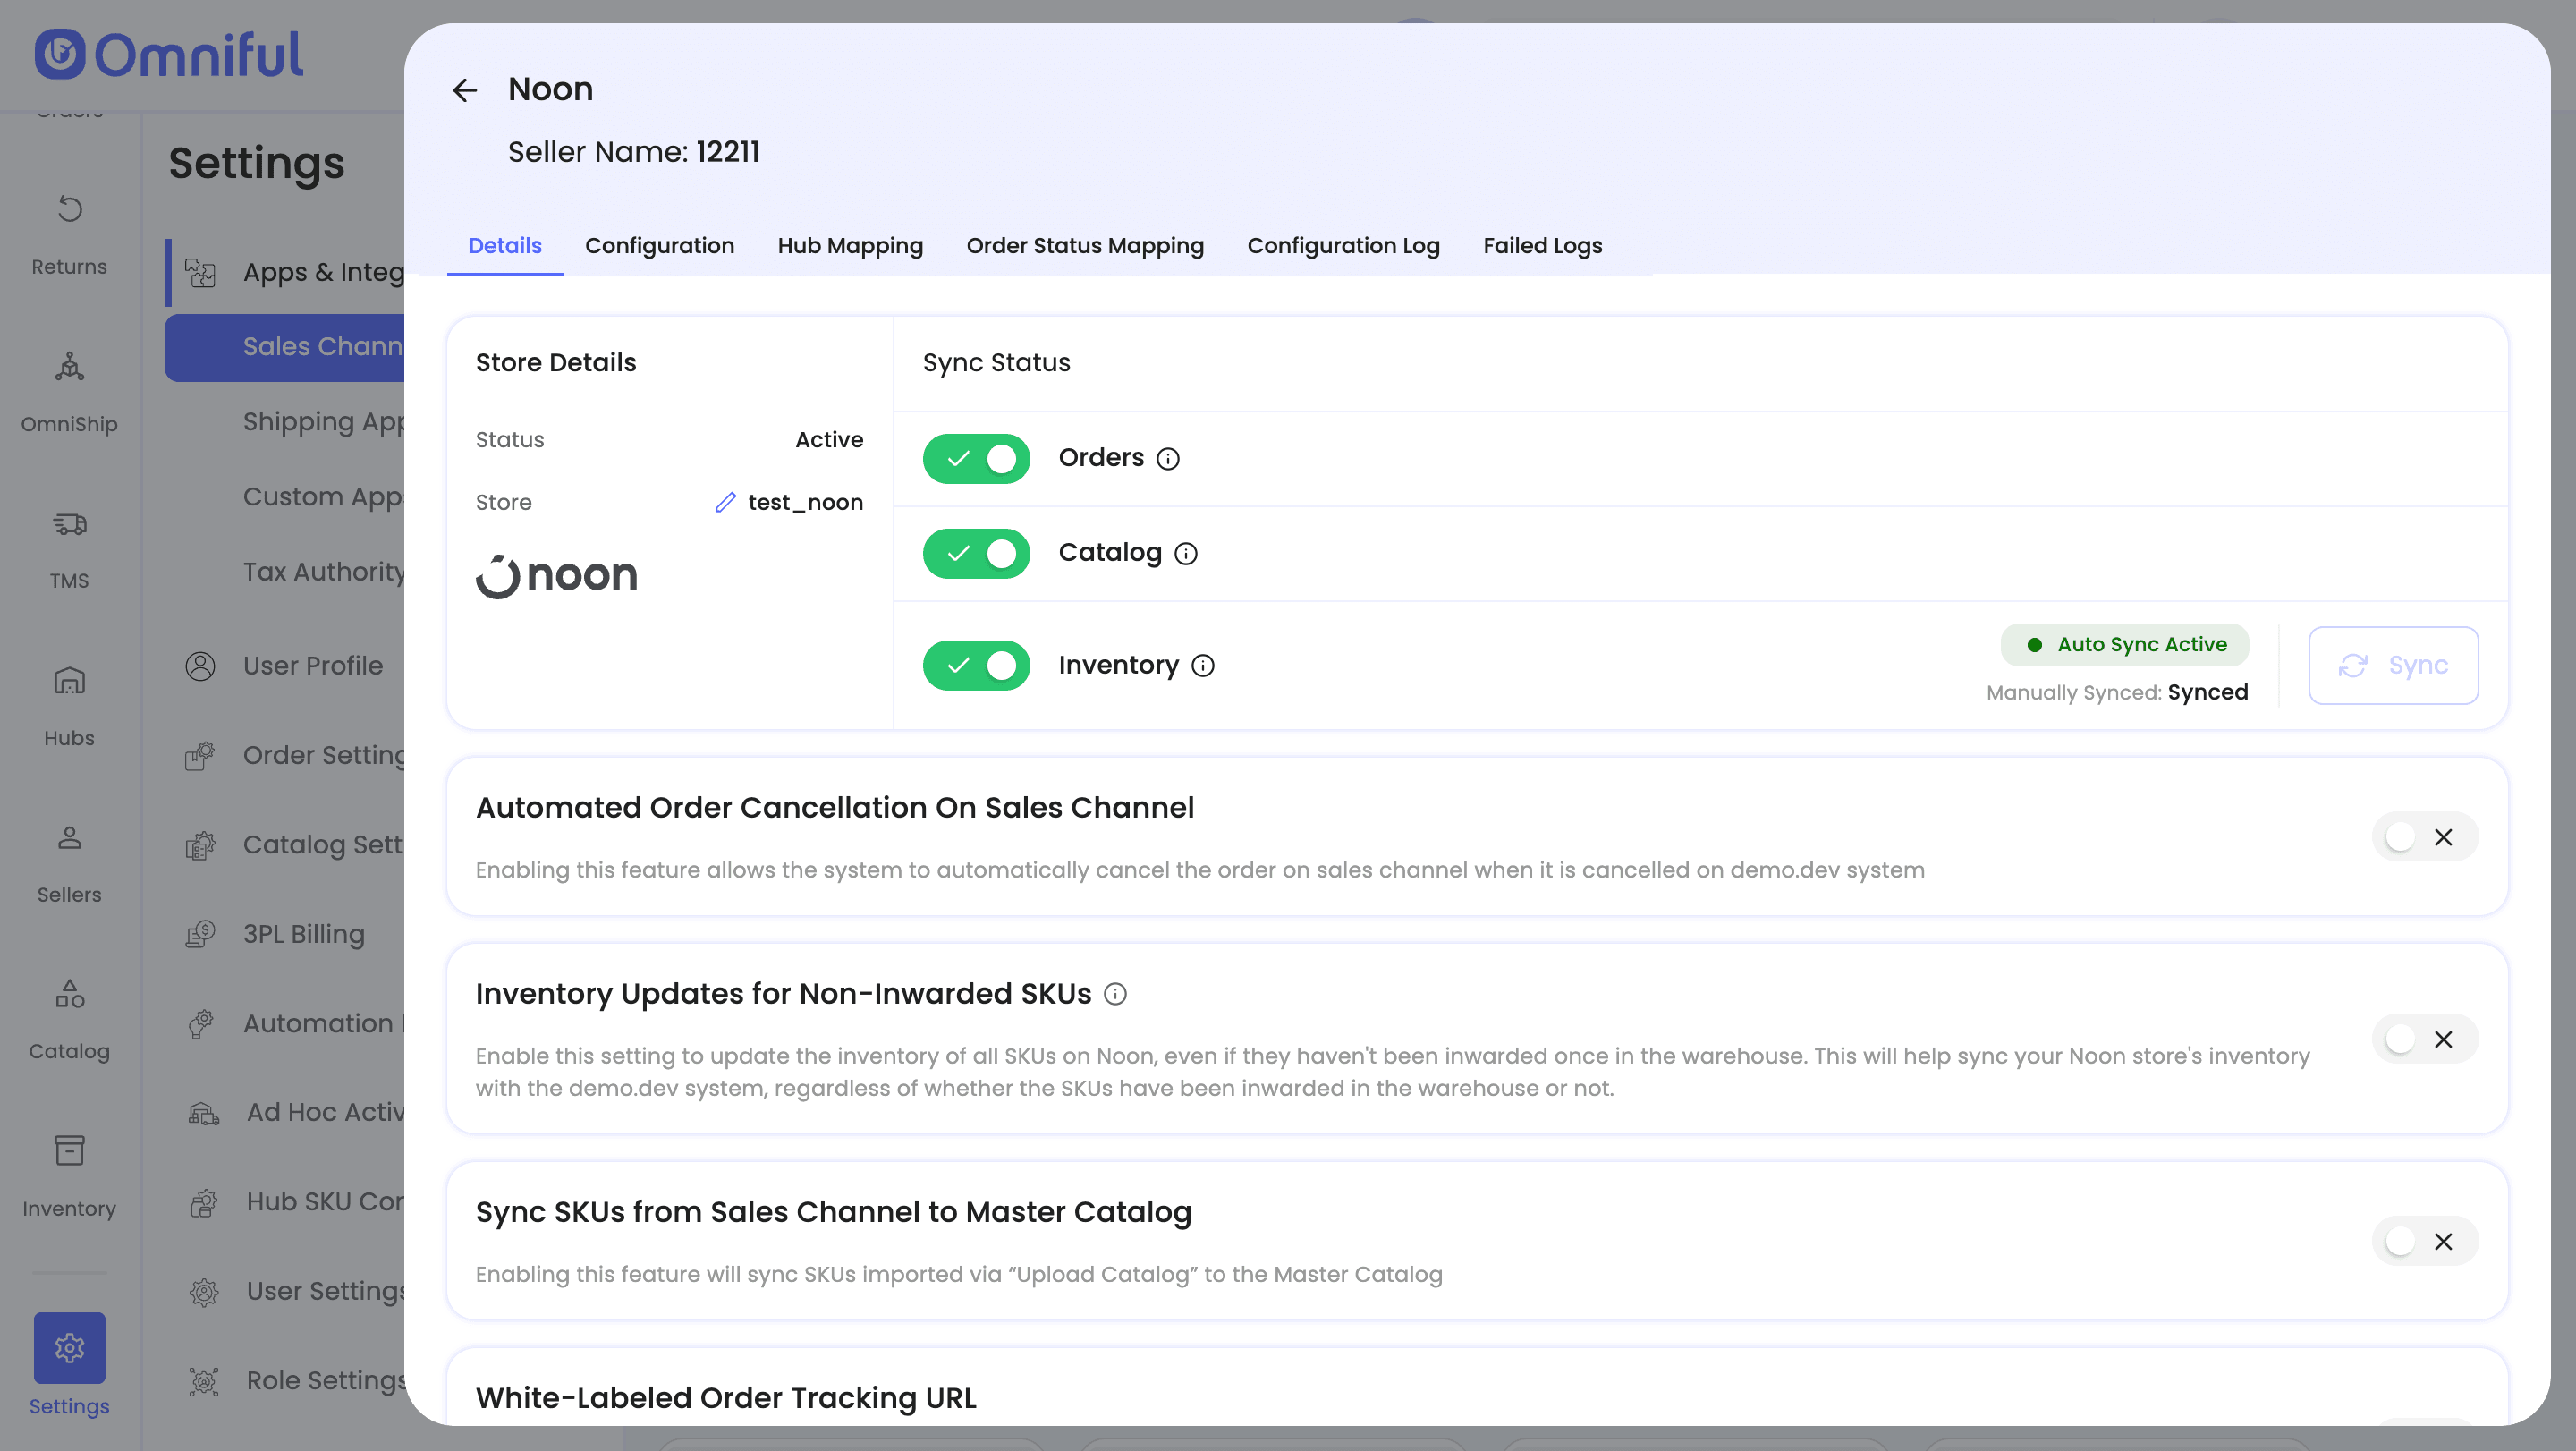
4.1 Store-level settings
Depending on your requirements, you can enable:
- Order Sync – Automatically fetch orders from Noon to Omniful.
- Inventory Sync – Push available inventory from Omniful hubs to Noon.
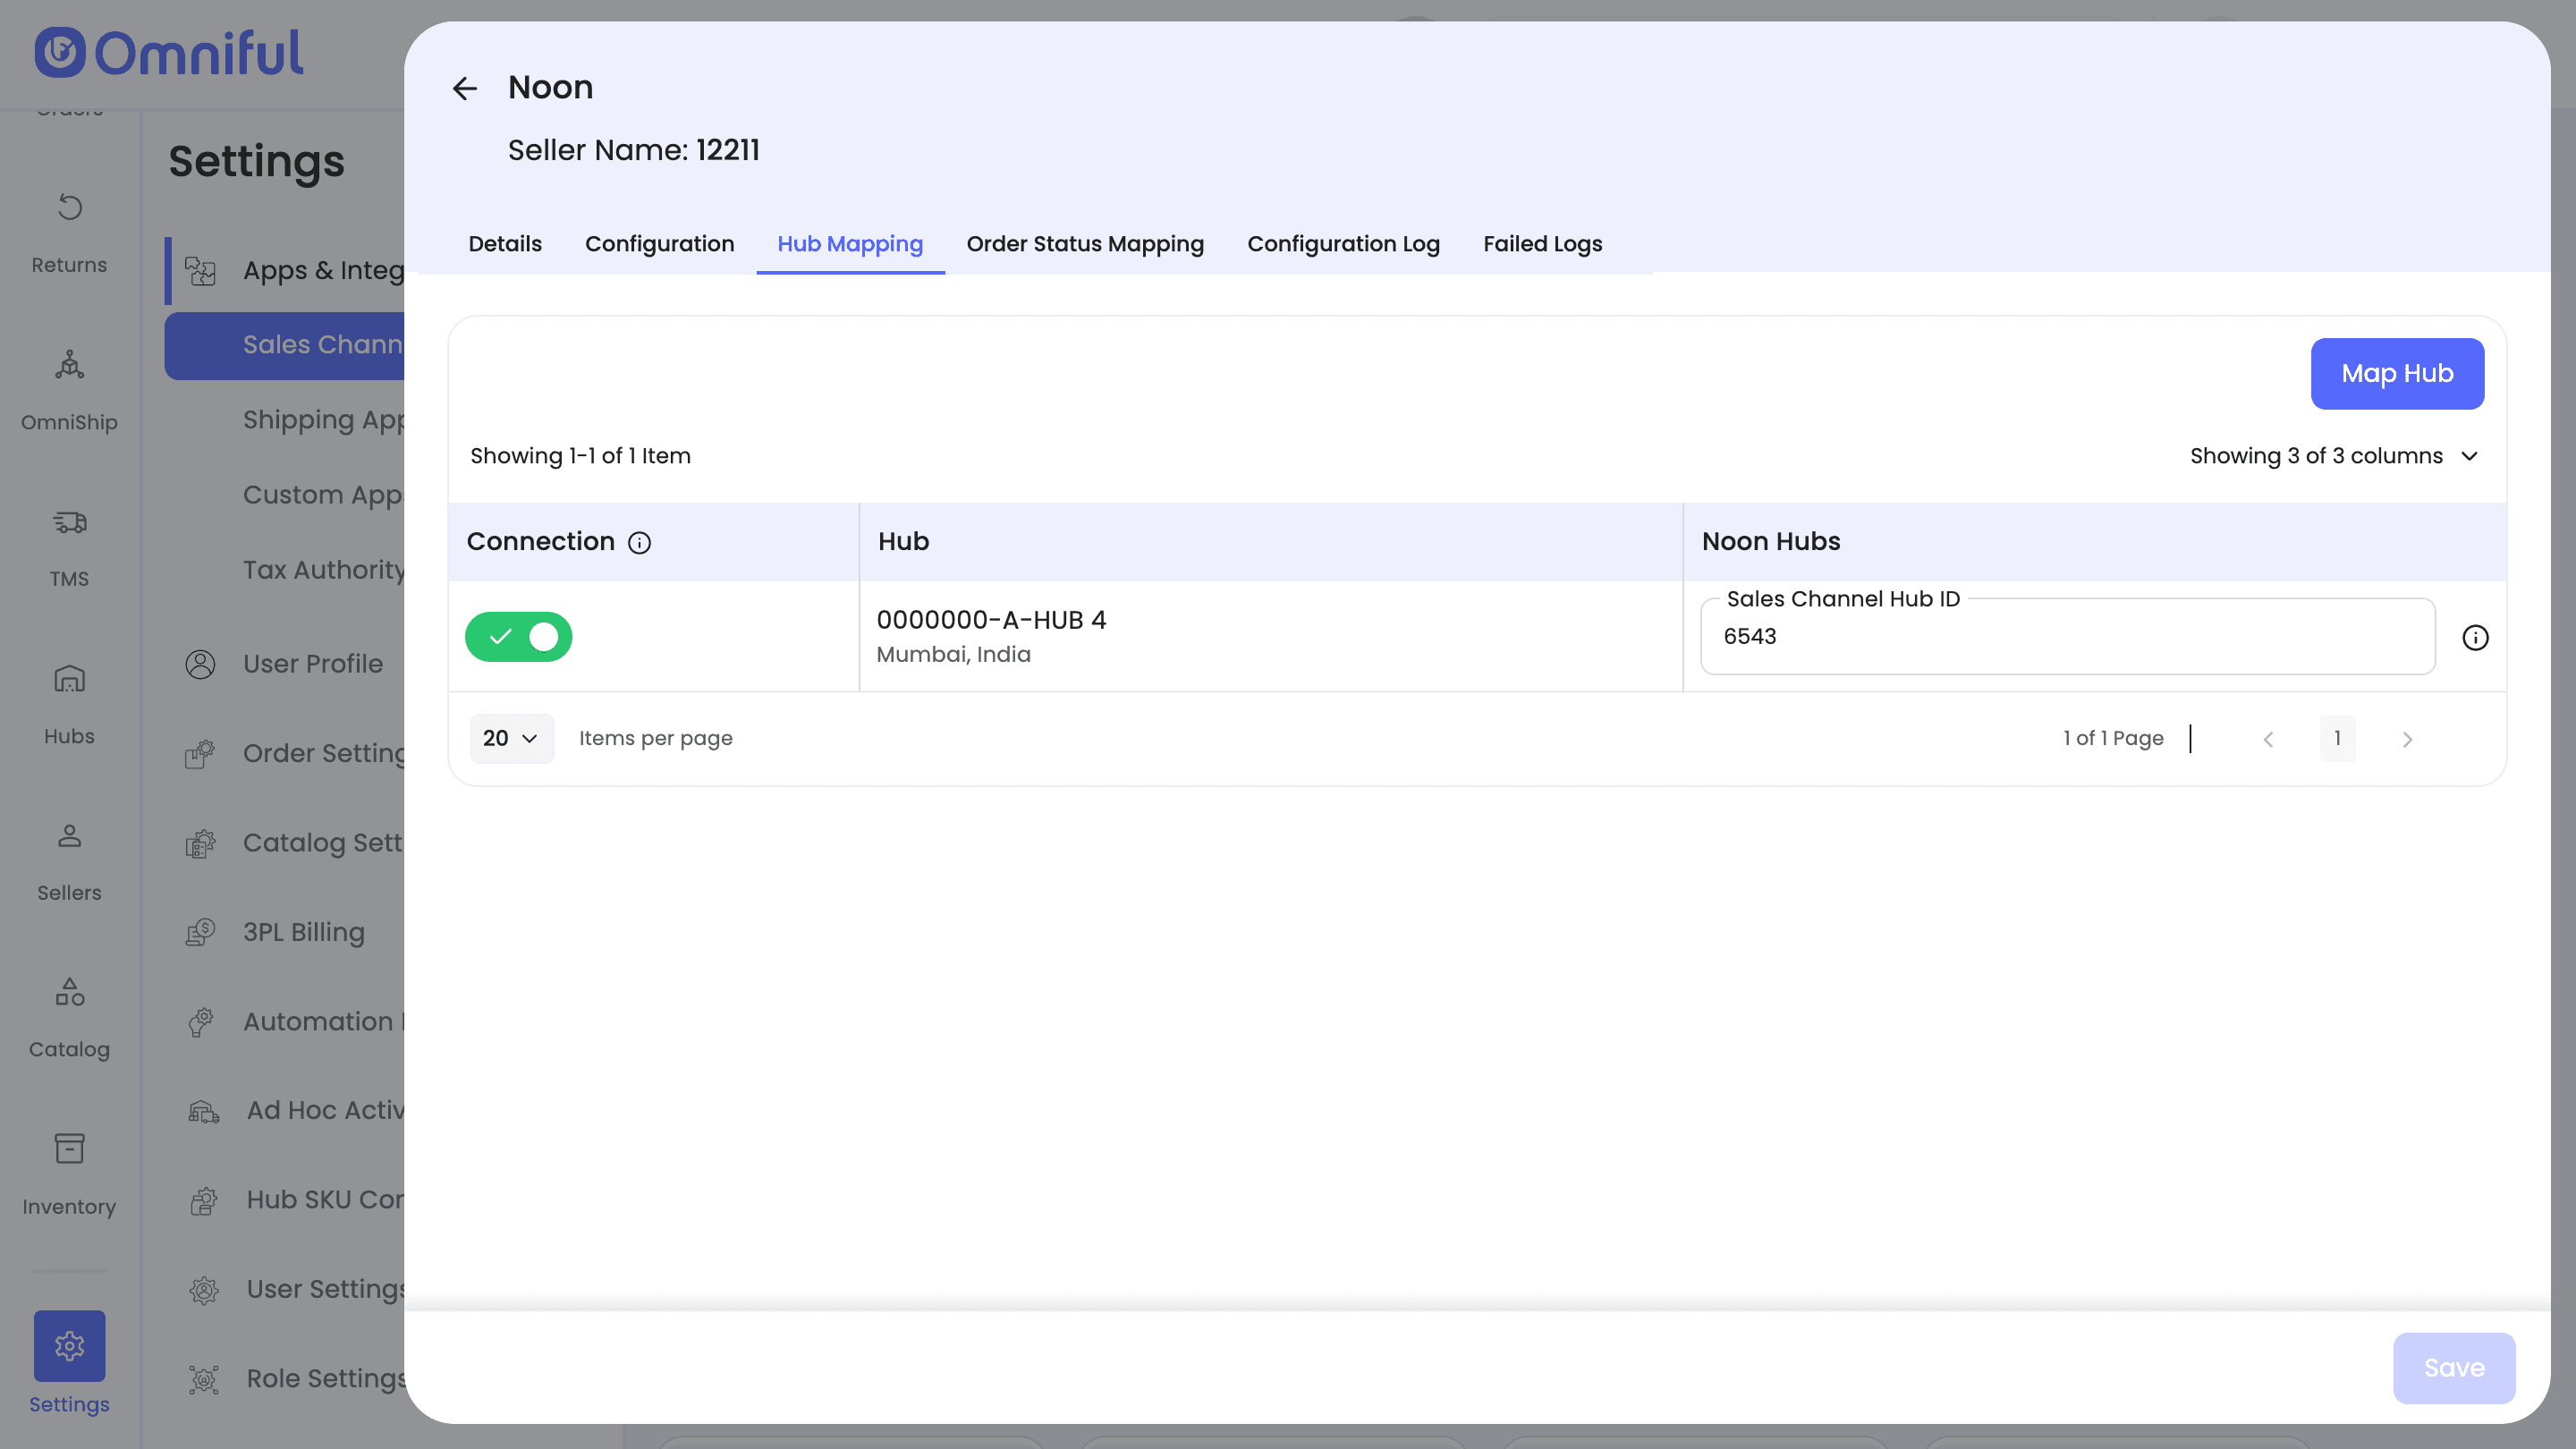
4.2 Hub Mapping
Configure how Noon orders are routed to Omniful hubs:
- Map Omniful Hubs to the hubs configured at Noon.
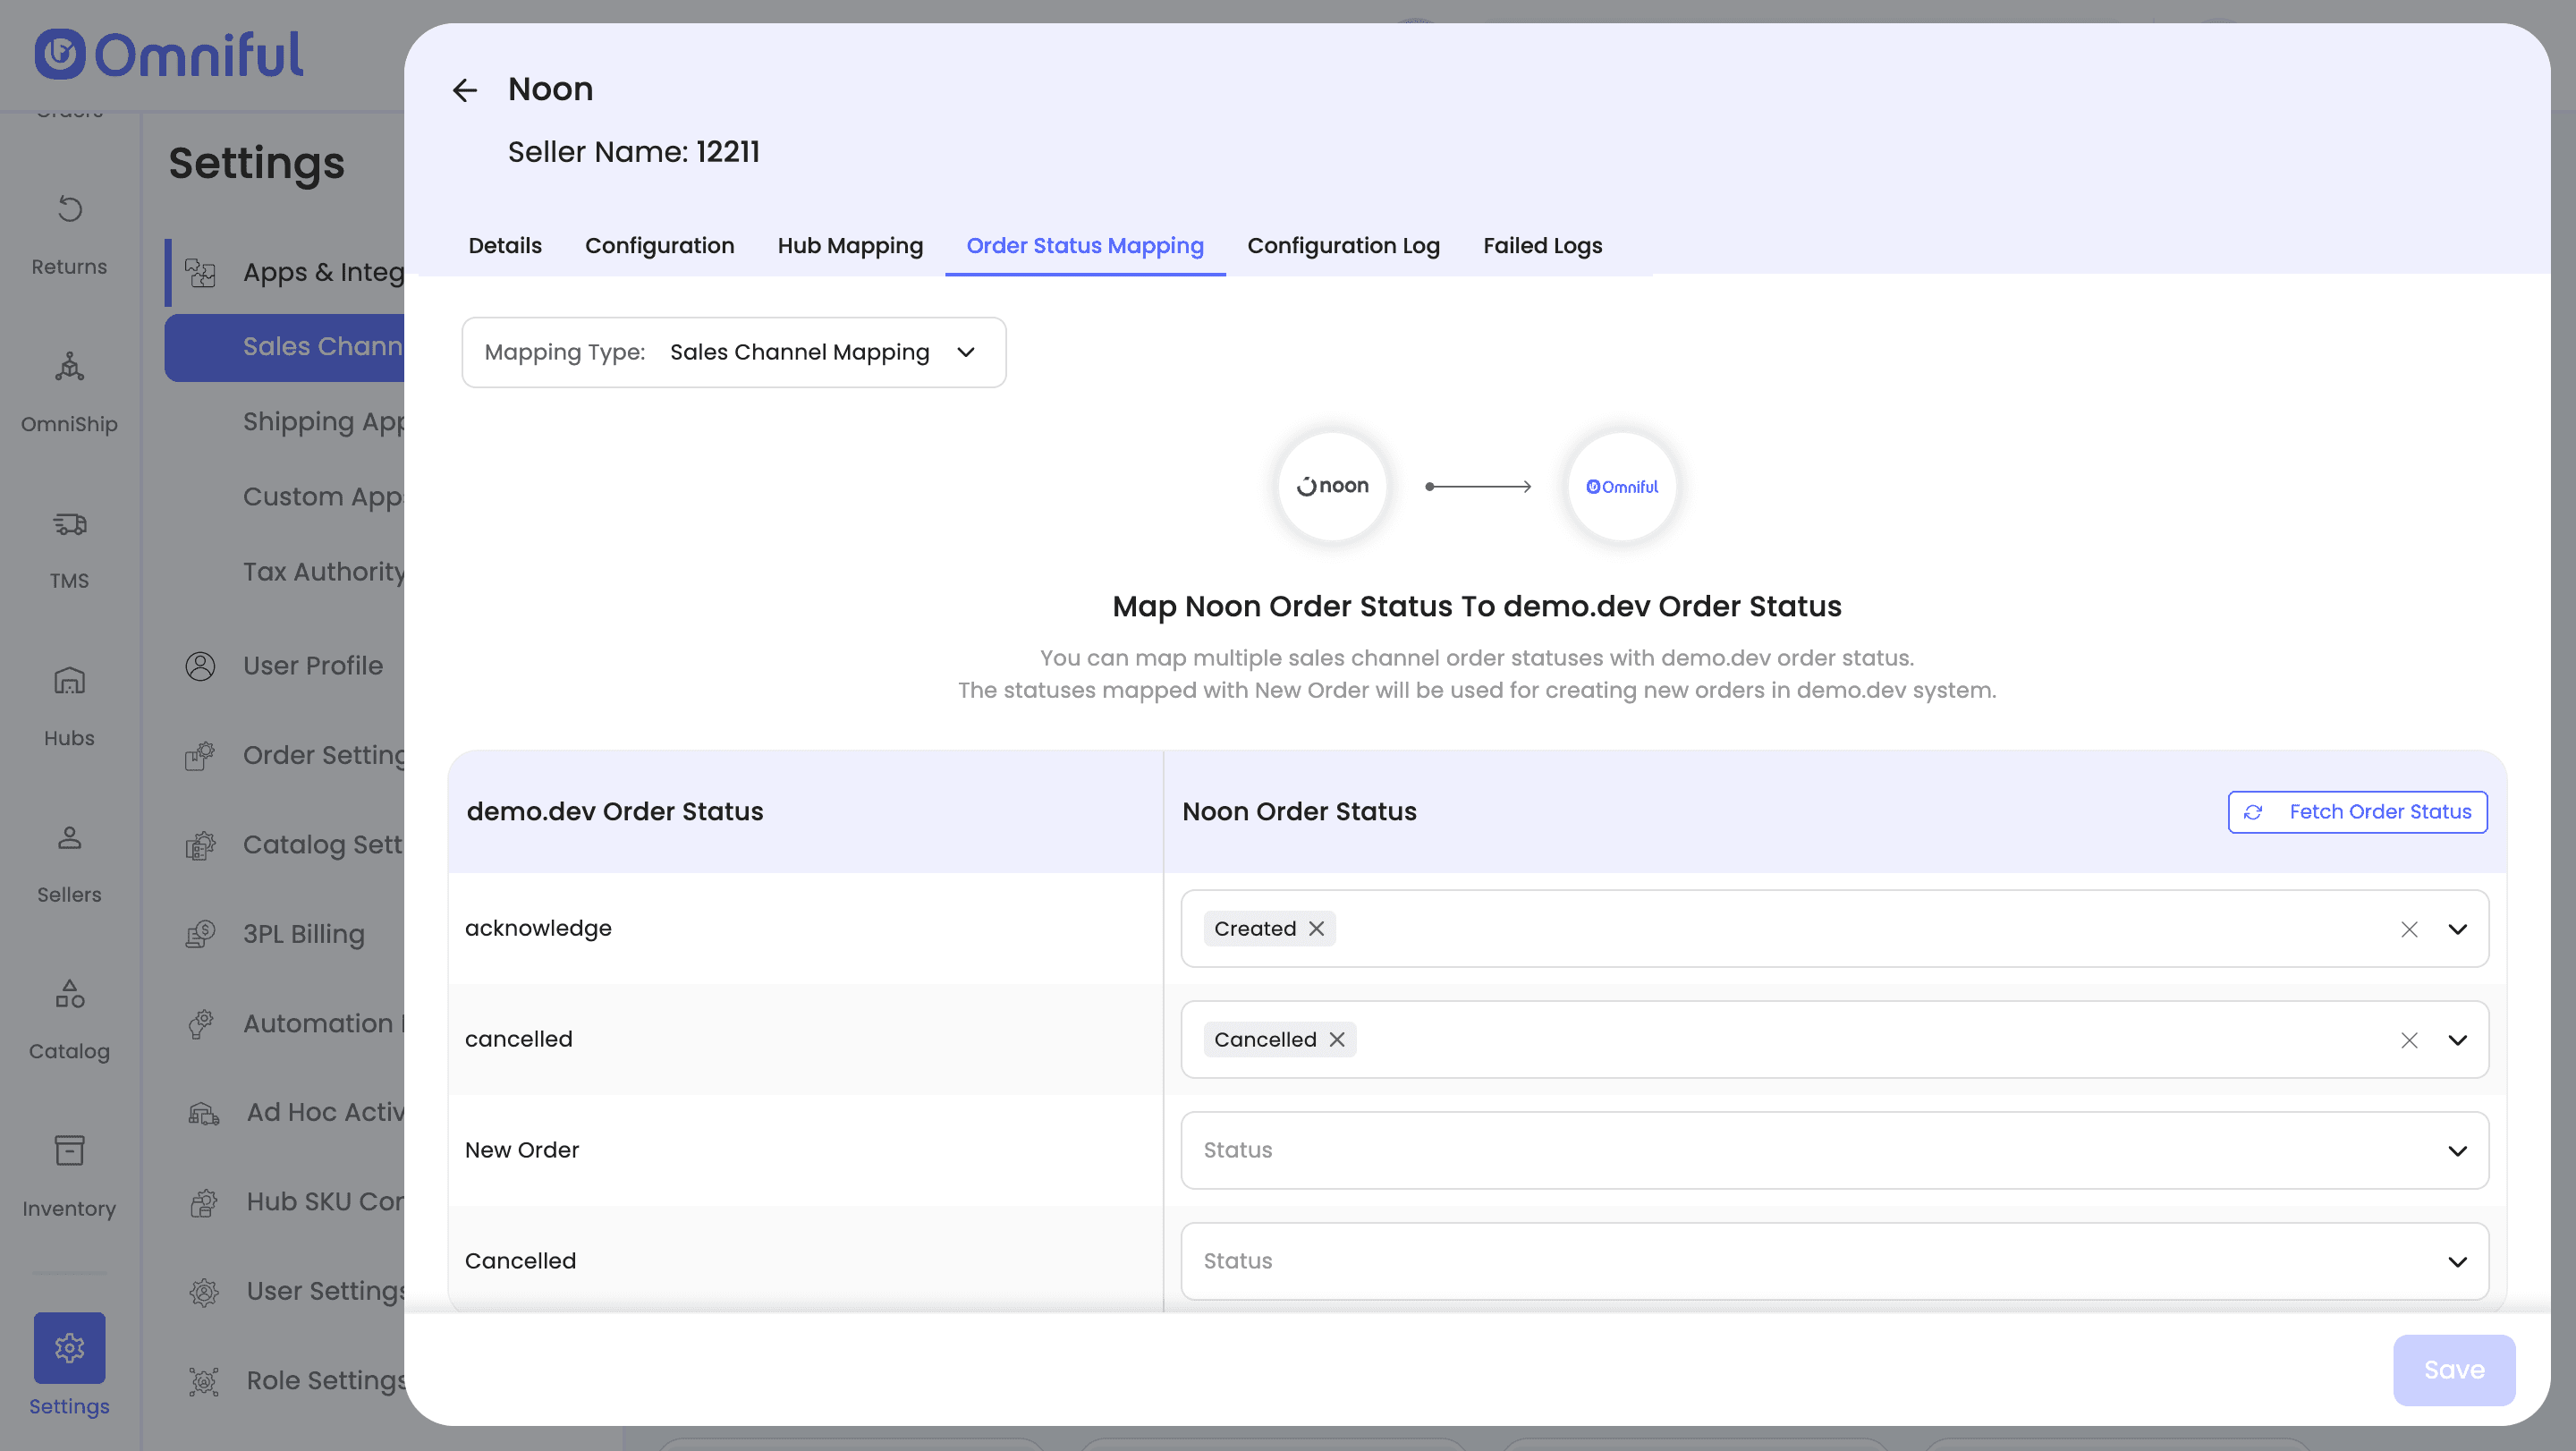
4.3 Order status mapping
Order Status Mapping defines how Noon statuses and Omniful statuses stay in sync.
Sales Channel Mapping –
Map incoming Noon order statuses (e.g., New, Accepted) to internal Omniful order lifecycle stages (e.g., New, Ready for Picking).
Note: Ensure Noon order statuses (such as New and Accepted) are configured correctly—otherwise new orders may not sync to Omniful. Likewise, if the cancelled status is not mapped, cancelled orders will not sync back to Noon.
Workspace Order Mapping –
Define which outgoing Omniful shipment/order statuses should be pushed back to Noon (for example, when the order is Rejected or Cancelled).
5. Data and Sync Behaviour
5.1 Orders
Which orders sync
- All orders for the mapped hubs will sync to Omniful.
- Only orders with the mapped order statuses will be visible in Omniful.
5.2 Catalog
Seller’s Noon store Catalog (SKUs) with valid SKU code should be uploaded to Omniful using the “Upload Catalog” feature available in Noon store configuration. Please ensure that the Noon Partner SKU Code is entered in the SKU code column of the catalog sheet.
SKUs sold on Noon must exist in the Omniful Master Catalog to support fulfilment.
Use Catalog Comparison to create Noon marketplace SKUs in the Master Catalog, or enable ‘Sync SKUs from Sales Channel to Master Catalog’ to automatically create Master Catalog SKUs from all the Noon Sales Channel Listing SKUs.
Note: If ‘Sync SKUs from Sales Channel to Master Catalog’ is enabled while the same SKUs already exist in the Master Catalog, the Noon Sales Channel Listing data will overwrite the existing Master Catalog SKU data.
5.3 Inventory
Omniful automatically pushes and maintains inventory levels on Noon store when Inventory Sync is enabled and the hub is mapped.
5.4 Cancellations
When ‘Automated Order Cancellation On Sales Channel’ is enabled, canceling an order in Omniful triggers an automatic cancellation on Noon, keeping both systems aligned.
6. FAQs
Q: My inventory is not syncing to Noon. What should I check?
A: Start by checking Noon Store Settings → Failed Logs for any inventory sync failures. If you find failed entries, click Manual Sync for inventory. Next, verify that the correct hubs are mapped. Then confirm the Noon API service account permissions under Users & Access → User Access—the API user must have the Project Owner role (roles like Project Viewer or any other limited role won’t work). Once the correct role is assigned, inventory sync should resume normally.
Q: My Noon orders are not appearing in Omniful. What should I check?
A: If orders are not syncing, verify the following:
- Order Sync is enabled in Store-Level Settings.
- The order’s Noon status is mapped under Sales Channel Mapping (e.g., Noon → New → Omniful New).
- The order belongs to a Noon hub that is mapped to an Omniful hub.
Q: Why are cancellations from Omniful not reflecting on Noon?
A: For Omniful → Noon cancellations to sync back:
- “Automated Order Cancellation on Sales Channel” must be enabled.
- Cancelled order status must be mapped from order status mapping tab.
Q: Who is the inventory master?
A: Omniful is the inventory master. Enabling Inventory Sync pushes available stock from Omniful to Noon.
Q: Who creates shipment of orders from Noon store?
A: As per Noon guidelines, for warehouses outside the countries SA, EG, or UAE, the shipment must be created by the fulfilment partner.
Q: How to create manifest after generating shipments in the Noon Partner Platform?
A: Sellers must manually create a manifest in Seller Lab for all shipments prepared for Noon collection, as pickup scheduling requires manifestation.
Log in to the Noon Partner Platform, go to Menu → noon → Fulfilled by Partner → Manifestation, select the intended warehouse, enter the number of shipments to hand over, and click Save Changes to create the manifestation.